Re: GCPD's Battle Reports
My friend and I have been plugging away at our Lustria campaign, and at the weekend we fought round two. This reminded me that I've completely neglected to post the report of round 1!
We actually had to refight this battle, since we got the scenario rules so terribly wrong. This time I only rolled one strategem, but employed again Master Thief to destroy the Dragonbane Gem.
The Warriors list was unchanged, whilst mine was drawn from a 2500 point list and didn't need to follow the regular army composition rules.
As a reminder of the scenario special rules: the Warriors were deployed in thin marching columns max 4 models wide (two for Monstrous Infantry). In the first turn, every unit on both sides had to roll a Leadership check in order to make any actions. All Jungle is Impassable Terrain (difficult to Skirmishers), and like Rivers (we use lakes instead) are not Mysterious. There's a Random Jungle Events chart that's rolled at the start of each turn, though I don't remember it doing much this game.
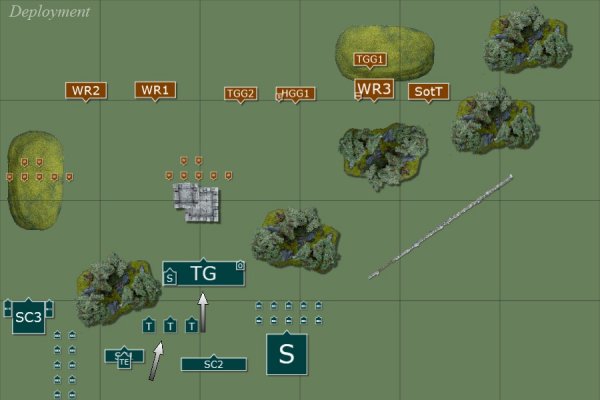
Deployment

Learning from the previous battle, my opponent deployed so that his flying combat units could charge up this line, and his BSB and General had overlapping bubbles. Meanwhile, I got terribly unlucky with both my flying Oldblood and Ripperdactyls starting in reserve and missing turn 1 charges.
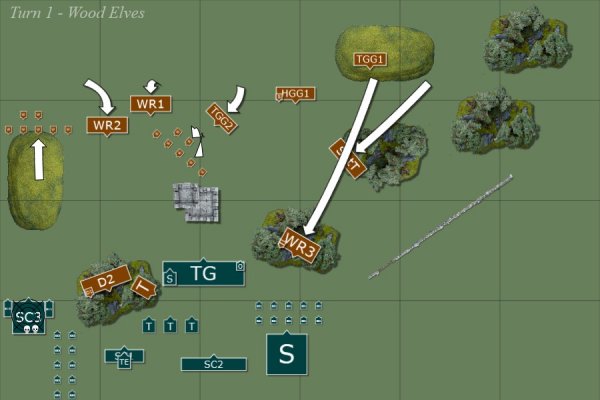
Lizardmen Turn 1

The ambush opens with a whimper rather than a bang, as the Oldblood and Ripperdactyls don't make it to the field in time, and only the Kroxigor emerge from the jungle to make contact with their enemy (only one out of three 9" charges made...)
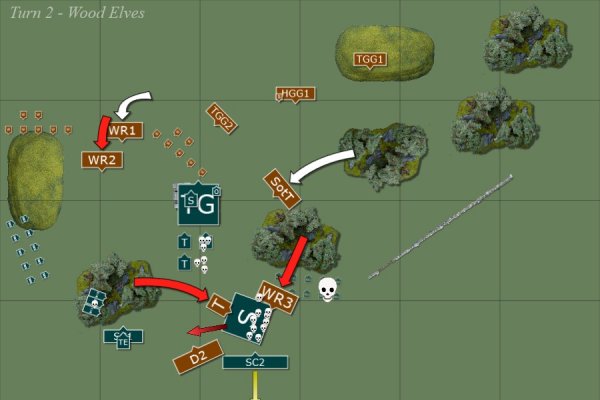
Warriors Turn 1

The Warriors launched their counter-attack, sending the Forsaken into the flank of the exposed Kroxigor; whilst the Exalted took on the Ancient alone, and the Daemon Prince – seeking the greatest challenge – hurtled into the ranks of the Temple Guard. However, at the head and rear of the column there was confusion – the Ogres, Warhounds and Chimera were all taken by surprise and left stumbling about; whilst the small unit of Warriors was unable to readdress their ranks (wasn't enough space to go 6 wide due to the dogs and Ogres both failing their leadership tests).
The elite Saurus were weakened further by Soulblight (I let it through – they are dead anyway) before the brave Revered Guardian was cut down, whilst a ruinous Purple Sun was scrolled. Meanwhile, the Kroxigor were massacred.
However, as the Exalted swept down upon the Ancient Stegadon, one determined Skink managed to get a lucky jab at him. The Exalted was off balance and began to topple from his Disc – only to find himself skewered on the horns of the mighty beast! (This was really unlucky. Weidling a Great Weapon, the Exalted went last. One of the Skinks managed to get an incredibly lucky wound through after both a failed armour save, and a ward save roll of 2. Then the humble Stegadon with its mere 3 attacks managed to do exactly the same, killing the Exalted outright before he even got a chance to swing. Despite a terrible opening, the Lizardmen were now suddenly back in the game!)
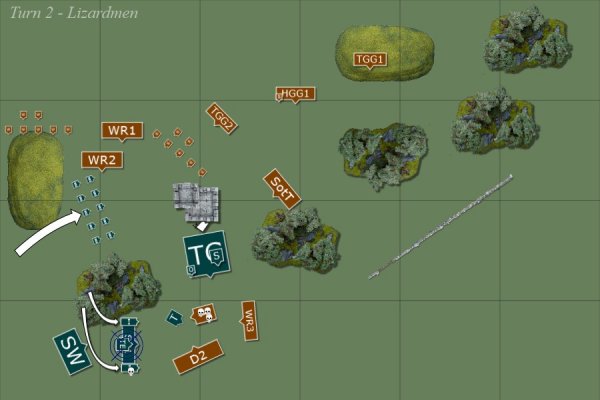
Lizardmen Turn 2

Inspired by the defeat of the Exalted, the Lizardmen line surged forwards. Fresh from its victory, the mighty Ancient Stegadon stampeded into the Ogres, killing two outright with its sharpeend horns, wounding a third, and breaking the unit.
Elsewhere, the Oldblood duelled the Skullcrusher champion inflicting one wound past its armour, but the unit held. Meanwhile, the Ripperdactyls pulled off a long charge into the flank of the Forsaken – along the way, they were bolstered by the Slann who cast Hand of Glory. Although the Forsaken fled, the frenzied mounts were too busy feasting on the mutated flesh to catch them.
A race against time has begun – can the Temple Guard hold out against the Daemon Prince long enough for the rest of the Lizardmen force to win the day*?
*Not shown: they lose another handful of models.
Warriors Turn 2

The head of the Warrior column redeployed to counter the rampaging Stegadon, whilst the Ogres continued their head-long flight from the field. In the centre, the Chimera fell upon the Ripperdactyls and there was a savage aerial battle where the mighty beast was dealt two grevious wounds from the smaller reptiles. But it was not enough, and two of them were cut down and the third fled for his life – only to be caught by the monstrous beast.
The large group of Warriors bore down upon the lonely Skink Priest, and the champion stepped forwards to claim what seemed to be an easy kill. But it was not to be, for the Old Ones blessed this Skink with incredibly good fortune – and he danced around the Champions attacks with surprising ease! (This is not the first time a Skink Priest has held up 18 Nurgle Warriors. Its not even the second or the third time. It won't be the last!).
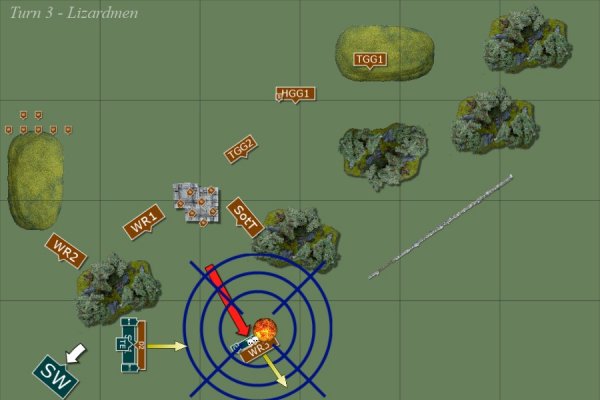
Lizadmen Turn 3

Once again the Ancient Stegadon roars and charges the Nurgle Ogres, driving them from the field (I had a choice here to ensure I got the VPs but expose the Stegadon to the Warriors; or turn to face the Warriors. I figured that either way I won't survive a charge from them, so might as well ensure the Ogres don't rally).
The Oldblood manages to finally win his challenge against the Skullcrusher Champion, and another full rank of Temple Guard are cut down. It looks like time has run out for them!
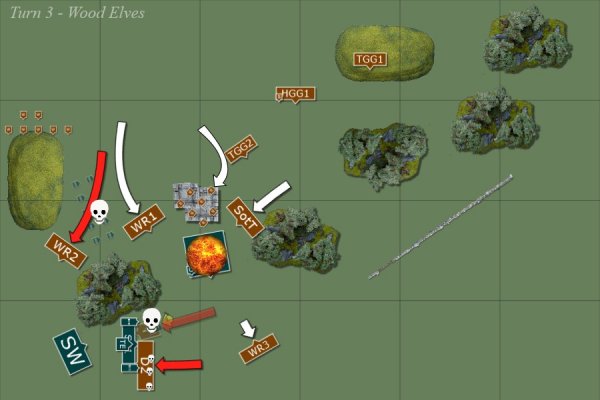
Warriors Turn 3

The Nurgle Warriors chase the Ancient Stegadon, who flees through a nearby lake (he's taken two wounds already and won't last long in a fight – I'm trying to keep this Warrior block away from my Oldblood long enough to kill the 'Crushers), and the Forsaken fall upon the Skink Cohort, though the unit holds. The Temple Guard are not so fortunate, however, and finally crumble under the might of the Daemon Prince, and are slaughtered as they flee.
The Chimera retreats to safety, nervous under the mighty arcane gaze of the Slann.
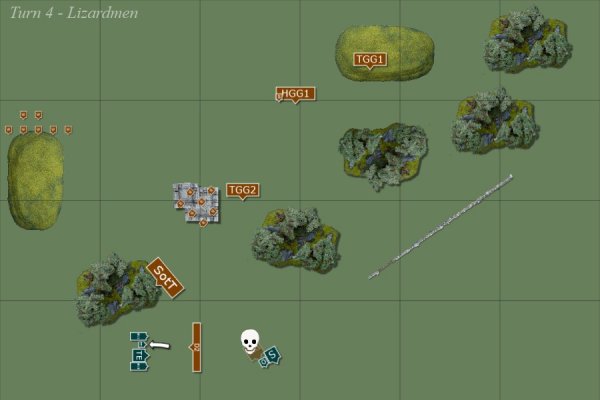
Lizardmen Turn 4

Threatened by the Nurgle Warriors, the Slann retreats behind the impassably dense Jungle. He turns to the Daemon Prince and, Skink Chameleons having successfully destroyed its protective ward prior to the battle, blasts him with an irresistible Searing Doom - banishing him back to the Realms of Chaos.
Warriors Turn 4

The small unit of Nurgle Warriors finally make contact with the Stegadon and fell the mighty beast, whilst the Oldblood is unable to penetrate the tough armour of the Skullcrushers. The larger unit continues to run down the Slann, and the warhounds move to surround the Oldblood.
Lizardmen Turn 5

The Slann continues his retreat, flinging Spells at depleted Warriors unit, whilst the Oldblood cuts down one more 'Crusher.
Warriors Turn 5

The last Skullcrusher finally breaks from combat and is run down by the Oldblood, whilst the rest of the Warrior units manoeuvre to entrap the Slann.
Lizardmen Turn 6

The Slann escapes the trap by casting Walk Between Worlds, allowing him to move through the impenetrable jungle as if it wasn't there. The Oldblood declines to charge the Warriors and instead withdraws into the Jungle for the ambush has clearly failed – although Chaos has not won the day, it has clearly retained enough strength to continue the invasion.
Post-game
I may have got a few turn orders wrong at the end of the game, but you get the idea: the Oldblood cleaned up the Skullcrushers, and the Warriors tried to box the Slann into a corner. He escaped by casting Walk Between Worlds, all the while chucking low level Fireballs at the stuff after him. At the time we put this as a conclusive draw: 1059 vs 1435 – forgetting that the BRB has been FAQ'd to say that you only need to score 100VPs more, rather than a twice the amount! Given the terrible start, though, I'll take a draw - it means that my opponent doesn't get any advantages in the next game like he would a victory (which is where it seemed to be going at the start).
Unit Analysis
21 Temple Guard is not enough. This unit just gets chewed up so quickly by Daemon Princes.
4 Kroxigor are terrible. This unit needs to be minimum 6 or gets dropped. Sadly, they compete for Special points with the aforementioned additional Temple Guard. There is an option to move them to Core, however.
Flyblood is still amazing. Its a shame that he took quite so long to defeat the Skullcrushers, but they were very lucky on their 4+ armour saves.
Ripperdactyls. I really like these guys. Any flying combat unit is great, giving me that lovely flank charge, but Armour Piercing on S4 is really huge – they were able to wound the Chimera twice simply through sheer weight of attacks, even without their Toad Rage.
High Magic. I really dislike this Lore. Despite its great utility, there were many times where I found myself without the right spells to cast, because in previous turns I hadn't been able to cast enough High spells to swap with. Other than Searing Doom, the Slann contributed very little to the battle because of this. I think I'd prefer to have access to all Signature Spells from the get-go, rather than the potential of swapping to them but not actually having them when I need them.
Next time...
With their ambush unsuccessful, the Lizardmen forces withdraw to marshal their full strength outside their Temple-City. Their beachhead now secure, the Warriors advance cautiously - wary of any further ambushes from the jungle, and giving time for reinforcements from the landing site to catch up.
According to the matrix, our next battle will be a Batteline. For their caution, the Warriors will get D3 strategems at the start of the game.
Hope you enjoy reading! Next battle will be up in a couple of days.
My friend and I have been plugging away at our Lustria campaign, and at the weekend we fought round two. This reminded me that I've completely neglected to post the report of round 1!
We actually had to refight this battle, since we got the scenario rules so terribly wrong. This time I only rolled one strategem, but employed again Master Thief to destroy the Dragonbane Gem.
The Warriors list was unchanged, whilst mine was drawn from a 2500 point list and didn't need to follow the regular army composition rules.
As a reminder of the scenario special rules: the Warriors were deployed in thin marching columns max 4 models wide (two for Monstrous Infantry). In the first turn, every unit on both sides had to roll a Leadership check in order to make any actions. All Jungle is Impassable Terrain (difficult to Skirmishers), and like Rivers (we use lakes instead) are not Mysterious. There's a Random Jungle Events chart that's rolled at the start of each turn, though I don't remember it doing much this game.
Deployment
Learning from the previous battle, my opponent deployed so that his flying combat units could charge up this line, and his BSB and General had overlapping bubbles. Meanwhile, I got terribly unlucky with both my flying Oldblood and Ripperdactyls starting in reserve and missing turn 1 charges.
Lizardmen Turn 1
The ambush opens with a whimper rather than a bang, as the Oldblood and Ripperdactyls don't make it to the field in time, and only the Kroxigor emerge from the jungle to make contact with their enemy (only one out of three 9" charges made...)
Warriors Turn 1
The Warriors launched their counter-attack, sending the Forsaken into the flank of the exposed Kroxigor; whilst the Exalted took on the Ancient alone, and the Daemon Prince – seeking the greatest challenge – hurtled into the ranks of the Temple Guard. However, at the head and rear of the column there was confusion – the Ogres, Warhounds and Chimera were all taken by surprise and left stumbling about; whilst the small unit of Warriors was unable to readdress their ranks (wasn't enough space to go 6 wide due to the dogs and Ogres both failing their leadership tests).
The elite Saurus were weakened further by Soulblight (I let it through – they are dead anyway) before the brave Revered Guardian was cut down, whilst a ruinous Purple Sun was scrolled. Meanwhile, the Kroxigor were massacred.
However, as the Exalted swept down upon the Ancient Stegadon, one determined Skink managed to get a lucky jab at him. The Exalted was off balance and began to topple from his Disc – only to find himself skewered on the horns of the mighty beast! (This was really unlucky. Weidling a Great Weapon, the Exalted went last. One of the Skinks managed to get an incredibly lucky wound through after both a failed armour save, and a ward save roll of 2. Then the humble Stegadon with its mere 3 attacks managed to do exactly the same, killing the Exalted outright before he even got a chance to swing. Despite a terrible opening, the Lizardmen were now suddenly back in the game!)
Lizardmen Turn 2
Inspired by the defeat of the Exalted, the Lizardmen line surged forwards. Fresh from its victory, the mighty Ancient Stegadon stampeded into the Ogres, killing two outright with its sharpeend horns, wounding a third, and breaking the unit.
Elsewhere, the Oldblood duelled the Skullcrusher champion inflicting one wound past its armour, but the unit held. Meanwhile, the Ripperdactyls pulled off a long charge into the flank of the Forsaken – along the way, they were bolstered by the Slann who cast Hand of Glory. Although the Forsaken fled, the frenzied mounts were too busy feasting on the mutated flesh to catch them.
A race against time has begun – can the Temple Guard hold out against the Daemon Prince long enough for the rest of the Lizardmen force to win the day*?
*Not shown: they lose another handful of models.
Warriors Turn 2
The head of the Warrior column redeployed to counter the rampaging Stegadon, whilst the Ogres continued their head-long flight from the field. In the centre, the Chimera fell upon the Ripperdactyls and there was a savage aerial battle where the mighty beast was dealt two grevious wounds from the smaller reptiles. But it was not enough, and two of them were cut down and the third fled for his life – only to be caught by the monstrous beast.
The large group of Warriors bore down upon the lonely Skink Priest, and the champion stepped forwards to claim what seemed to be an easy kill. But it was not to be, for the Old Ones blessed this Skink with incredibly good fortune – and he danced around the Champions attacks with surprising ease! (This is not the first time a Skink Priest has held up 18 Nurgle Warriors. Its not even the second or the third time. It won't be the last!).
Lizadmen Turn 3
Once again the Ancient Stegadon roars and charges the Nurgle Ogres, driving them from the field (I had a choice here to ensure I got the VPs but expose the Stegadon to the Warriors; or turn to face the Warriors. I figured that either way I won't survive a charge from them, so might as well ensure the Ogres don't rally).
The Oldblood manages to finally win his challenge against the Skullcrusher Champion, and another full rank of Temple Guard are cut down. It looks like time has run out for them!
Warriors Turn 3
The Nurgle Warriors chase the Ancient Stegadon, who flees through a nearby lake (he's taken two wounds already and won't last long in a fight – I'm trying to keep this Warrior block away from my Oldblood long enough to kill the 'Crushers), and the Forsaken fall upon the Skink Cohort, though the unit holds. The Temple Guard are not so fortunate, however, and finally crumble under the might of the Daemon Prince, and are slaughtered as they flee.
The Chimera retreats to safety, nervous under the mighty arcane gaze of the Slann.
Lizardmen Turn 4
Threatened by the Nurgle Warriors, the Slann retreats behind the impassably dense Jungle. He turns to the Daemon Prince and, Skink Chameleons having successfully destroyed its protective ward prior to the battle, blasts him with an irresistible Searing Doom - banishing him back to the Realms of Chaos.
Warriors Turn 4
The small unit of Nurgle Warriors finally make contact with the Stegadon and fell the mighty beast, whilst the Oldblood is unable to penetrate the tough armour of the Skullcrushers. The larger unit continues to run down the Slann, and the warhounds move to surround the Oldblood.
Lizardmen Turn 5
The Slann continues his retreat, flinging Spells at depleted Warriors unit, whilst the Oldblood cuts down one more 'Crusher.
Warriors Turn 5
The last Skullcrusher finally breaks from combat and is run down by the Oldblood, whilst the rest of the Warrior units manoeuvre to entrap the Slann.
Lizardmen Turn 6
The Slann escapes the trap by casting Walk Between Worlds, allowing him to move through the impenetrable jungle as if it wasn't there. The Oldblood declines to charge the Warriors and instead withdraws into the Jungle for the ambush has clearly failed – although Chaos has not won the day, it has clearly retained enough strength to continue the invasion.
Post-game
I may have got a few turn orders wrong at the end of the game, but you get the idea: the Oldblood cleaned up the Skullcrushers, and the Warriors tried to box the Slann into a corner. He escaped by casting Walk Between Worlds, all the while chucking low level Fireballs at the stuff after him. At the time we put this as a conclusive draw: 1059 vs 1435 – forgetting that the BRB has been FAQ'd to say that you only need to score 100VPs more, rather than a twice the amount! Given the terrible start, though, I'll take a draw - it means that my opponent doesn't get any advantages in the next game like he would a victory (which is where it seemed to be going at the start).
Unit Analysis
21 Temple Guard is not enough. This unit just gets chewed up so quickly by Daemon Princes.
4 Kroxigor are terrible. This unit needs to be minimum 6 or gets dropped. Sadly, they compete for Special points with the aforementioned additional Temple Guard. There is an option to move them to Core, however.
Flyblood is still amazing. Its a shame that he took quite so long to defeat the Skullcrushers, but they were very lucky on their 4+ armour saves.
Ripperdactyls. I really like these guys. Any flying combat unit is great, giving me that lovely flank charge, but Armour Piercing on S4 is really huge – they were able to wound the Chimera twice simply through sheer weight of attacks, even without their Toad Rage.
High Magic. I really dislike this Lore. Despite its great utility, there were many times where I found myself without the right spells to cast, because in previous turns I hadn't been able to cast enough High spells to swap with. Other than Searing Doom, the Slann contributed very little to the battle because of this. I think I'd prefer to have access to all Signature Spells from the get-go, rather than the potential of swapping to them but not actually having them when I need them.
Next time...
With their ambush unsuccessful, the Lizardmen forces withdraw to marshal their full strength outside their Temple-City. Their beachhead now secure, the Warriors advance cautiously - wary of any further ambushes from the jungle, and giving time for reinforcements from the landing site to catch up.
According to the matrix, our next battle will be a Batteline. For their caution, the Warriors will get D3 strategems at the start of the game.
Hope you enjoy reading! Next battle will be up in a couple of days.


") but he didn't scout)
but he didn't scout)")
 Skinks didn't wound, Bastiladon missed with all but one attack (including the S10).


