The Road to SCGT - Practice Game 1!
So my first game was up against my old sparring buddy and his Warriors, this time run as a Legions of Chaos list run by the Maggoth Lord Morbidex Twiceborn himself.
Legion! (Incorrectly called Warriors in the maps. Sorry!)
Morbidex Twiceborn
Sorceror Lord, Level 4, Mark of Tzeentch, Ogre Blade, Helm of Many Eyes, Talisman of Endurance, Potion of Foolhardiness, Lore of Tzeentch, Disc of Tzeentch.
Exalted Hero, BSB, Enchanted Shield, Luckstone, stuff? Mark of Nurgle
18 Nurgle Warriors, Halberds, Full Command.
12 Khorne Warriors, Additional Hand Weapons, Full Command, Banner of Swiftness.
5 Warhounds
5 Hellstriders, Banner & Musician.
3 Screamers
3 Skullcrushers, Banner & Musician.
3 Plague Drones, Banner & Musician.
Burning Chariot of Tzeentch.
Sorceror Lord: Glean Magic, Infernal Gateway, Flickering Fire, Bolt.
Skink Priest: Iceshard Blizzard, Curse of the Midnight Wind.
We both had to declare secret missions as our comp scores were equal (3). I picked ‘destroy more rare/special choices,’ on account of the fact that I struggled with this one every time I used it previously, and I also only had 2 so made it an easy win even if Morbidex runs me over. The WoC elected to capture more table quarters, hoping to use their mobile Fortitude to good effect.

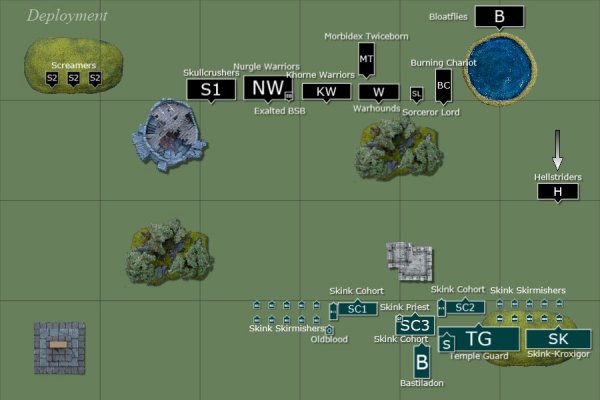
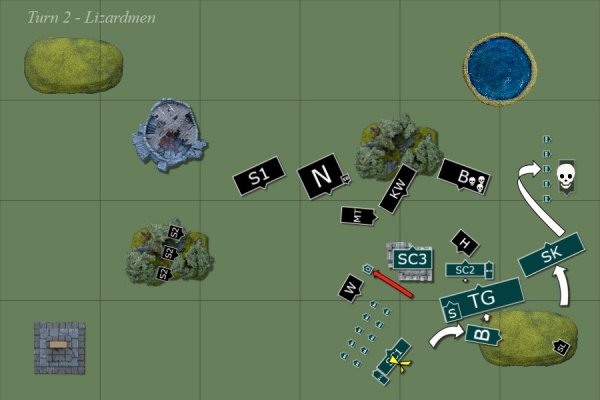
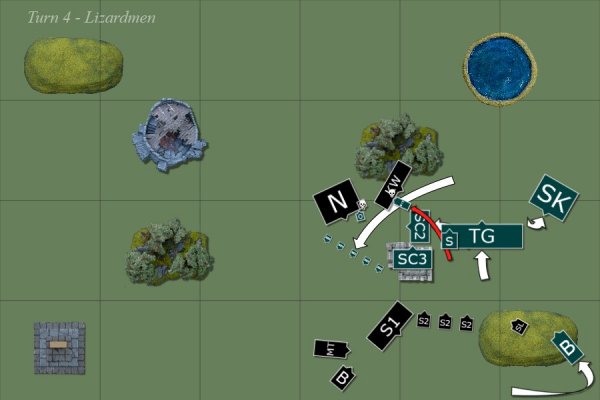
Deployment saw the Legion concentrated in the centre, with the Lizards in a refused flank. I 100% entirely blame the US Masters for this – I’d been watching the live stream over the weekend and had the pleasure of watching Lizardmen in game 2. They used a deployment which was very, very similar to this to good effect and I wanted to see if I could mimic it.
With that, Legion got the first turn!

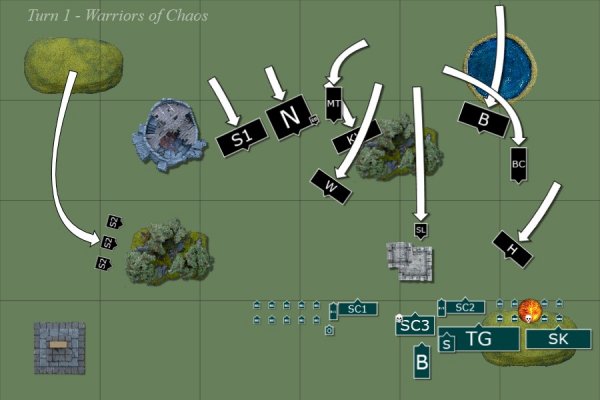
The Sorceror Lord hurtles forward alone, with only the Legion light elements moving up in support, and the centre altogether more cautious. The Nurgle Warriors are forced to reform into ranks of 5 in order to allow the Skullcrushers through the gap. Meanwhile, the Screamers attempt to complete the encirclement. Entering the Forest, the Warhounds reveal it to be a Fungus Wood.
Turning his attention towards the Skink Priest, the Sorceror Lord uses Glean Magic to steal Curse of the Midnight Wind. The Skink then dies to the flickering Warpflame. In a cold rage, the Slann dispels any further casting attempts with contemptible ease.
(D’oh! This was a major mistake on my part. I wasn’t much bothered about losing a Skink level and a spell, or even a wound. But I completely forgot about Warpflame, which decimates T2 Skinks. This meant I lost my Scroll straight off the bat. Eek.
On this note, we weren’t sure whether Warpflame affected the whole unit, or just the target of the spell. The wording isn’t clear on this so in the end we diced off and it came up just the Skink. What’s the LO verdict?)
Khorne’s wrath falls upon the rightmost Skink Skirmishers, but only one of the reptiles is killed.

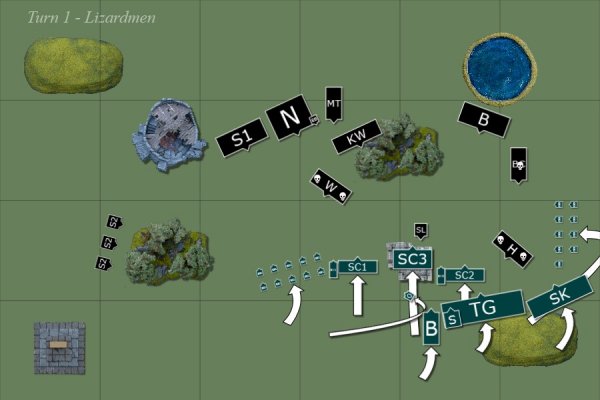
The Lizardmen lines shuffle only slightly, with the major movements being the right flank beginning to swing around the tower. However, the central Scar-Vet is unable to control his mount and the unit stumbles forwards.
Drawing upon the winds of magic, the Slann casts Unforging on the Sorceror Lord, but only destroys a Potion of Foolhardiness. Nonetheless, this reveals that he has no protection against fire damage. The Skinks entreat the Solar Engine to engage and despite successfully firing, they fail to invoke the proper rituals in the correct order and the beam of light quickly disperses (d6 s4 hits).
Combined Skink shooting puts one wound on the Plague Drones, another on the Burning Chariot, and kills off two Hellstriders and two Warhounds.

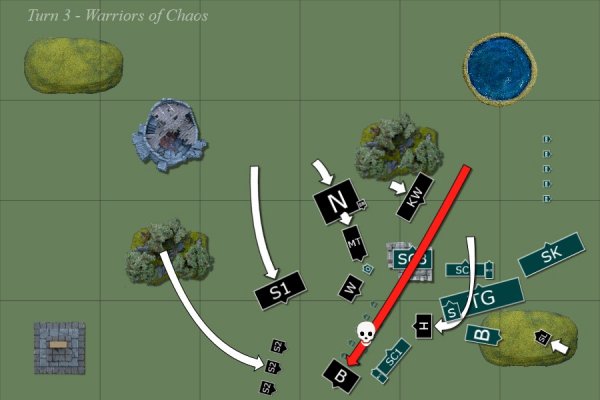
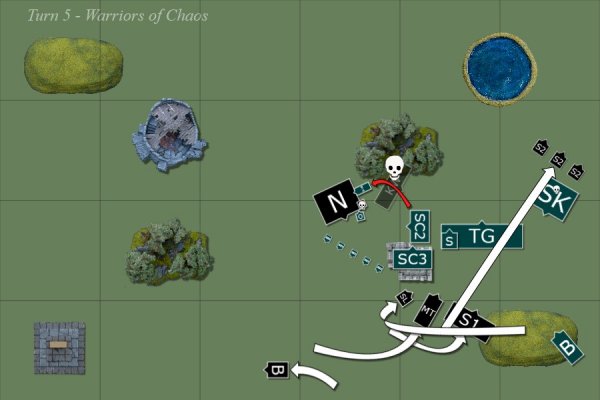
The Legion right flank swings into action, with the Screamers charging the Skirmishers – who flee – and the Skullcrushers charging the Scar-Vet’s unit, which also withdraw.
Swooping over the heads of the Temple Guard, the Sorceror Lord turns his attention towards the Slann, but Glean Magic is dispelled. In fact, the Winds blow so lightly that the Daemons present on the field begin to fade back into the Realms (-1 Ward saves).
The Burning Chariot claims the lives of 4 Skinks, but they gain Regeneration due to the fickle whim of Tzeentch.

Sensing an opportunity, the Oldblood attempts to charge the Skullcrushers – but his levitating device malfunctions and drops him back down to earth well short of his target (but safely out of the arc of Morbidex!). Both fleeing units rally, and the swing around the tower is partially blocked by the Hellstriders.
Once again the Solar Engine engages, and once again the light splutters out (I think this one was even a D3 S3).
The Skink Skirmishers put a further wound on the Burning Chariot, with a volley from the Skink-Kroxigor destroying it outright. The Skinks in the tower then lob a hail of javelins to kill the wounded Plague Drone.
(I elect not to shoot the Hellstriders, as they were neatly blocking any charges from the Khorne Warriors in the WoC next turn).

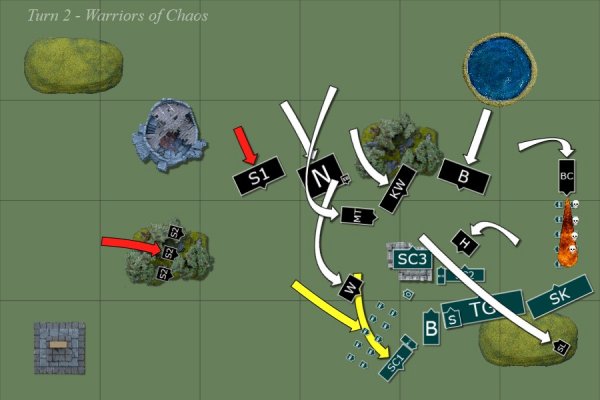
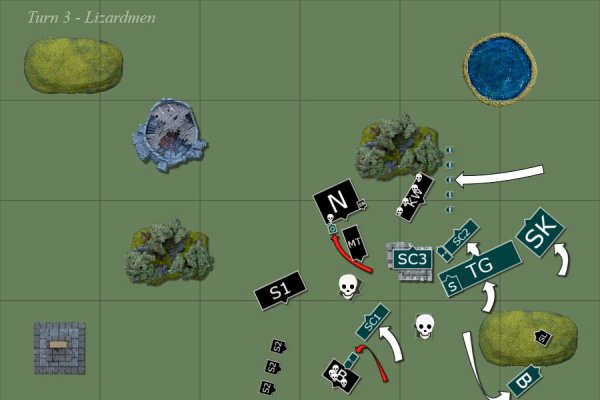
Eager to exact revenge for their fallen comrade, the Plague Drones are able to sight the flank of the Skirmishers and take flight over the tower. (A very good move by my opponent into a vulnerable flank – needing a 9 on the dice but got it off). However, calamity strikes when both the Khorne Warriors succumb to the intoxicating spores of the Fungus Wood (yup, even with a BSB), and the Helm of Many Eyes makes the Sorceror Lord stupid as well..
With the Sorceror Lord unable to cast there is no magic. A sudden plague brought upon by Grandfather Nurgle ripples through the Lizardmen ranks, but adapted to the extremes of Lustria, none of the reptiles catch anything.
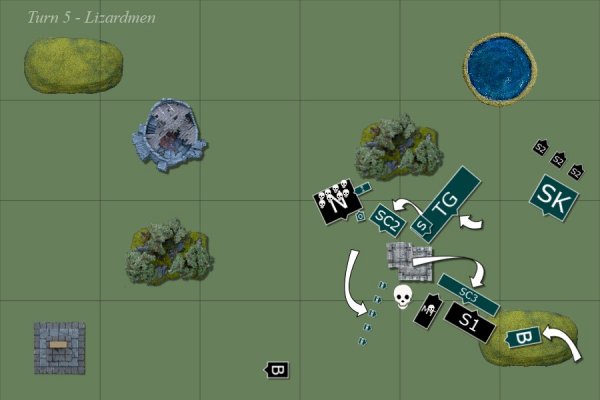
The Skink Skirmishers are predictably crushed by the Drones, but in their overrun they are left precariously exposed (a place I like to call the Danger Zone).

Ignoring Morbidex’s taunting, the Oldblood uses his levitation device to swoop around him and into the Nurgle Warriors. The Scar-Vet also charges out of the Skink unit and into the Drones. Free of the interference of the Hellstriders, the swing around the tower continues unabated, with the Skink-Kroxigor going into ranks in anticipation of combat, and the Skirmishers running up to delay the Khorne Warriors.
Confident that they are now reading the incantations correctly, the Engine engages on the Sorceror Lord for a third time... but for a third time something is still awry with the mechanism (another D6 S4 hits!).
With the sun high in the sky giving perfect vision, this is the ideal moment for Skink javelins. A hail of them fall on the Chaos Warriors like rain, and even their thick Chaos Armour is not enough to withstand the barrage as nearly half their number fall. The Skink unit that rallied last turn also shoots off the dogs, after manoeuvring to offer a charge to the Skullcrushers, and the Skinks in the tower kill the last three Hellstriders.
The Oldblood slaughters the Aspring Champion in a challenge, and after taking one wound from the Scar-Vet a Plague Drone fades from the material realm (the Scar-Vet largely whiffed his attacks and I was unlucky not to get the whole unit – the last was left on one or two wounds I believe).

Denied his victim, Morbidex finds another and charges the Scar-Vet. In a synchronised assault, the Skullcrushers charge through his wake and into the Skinks. Back in the centre, the Khorne Warriors display an uncharacteristic bout of caution, and withdraw back into the Forest in order to cover the flank of the Nurgle Warriors. With his many eyes blinded by the Solar Engine beam, the Sorceror Lord once again stumbles forwards.
Morbidex slaughters the Scar-Vet with contemptible ease, with the Oldblood inflicting one wound on the Exalted and taking one himself. With the nearby urging of the Slann, however, he manages to hold. Easily wiping out the Skinks, the Skullcrushers overrun is blocked by the Screamers (clever placement there!).
I don’t remember what the Reign result was this round but there wasn’t any impact. Sorry!

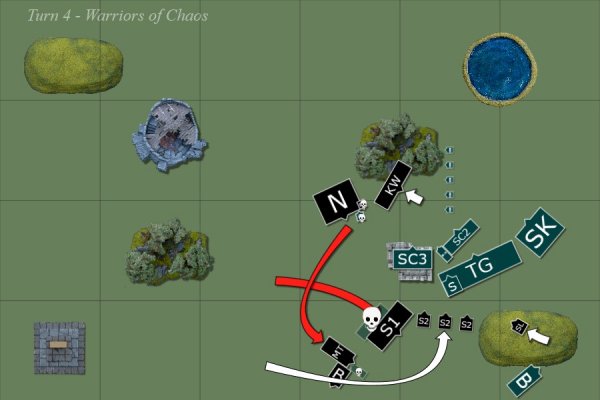
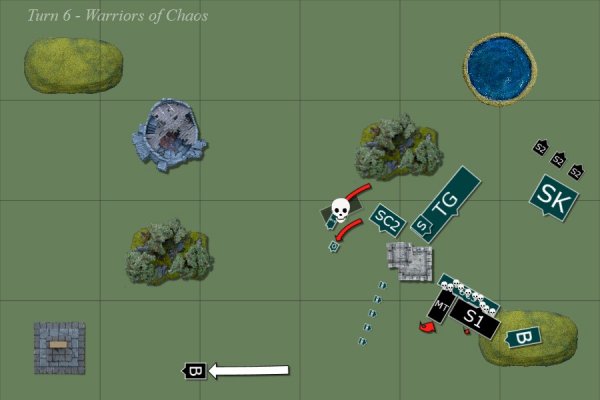
The surviving Scar-Vet charges out of the Skink unit into the depleted Khorne Warriors, while the line continues to evade the encroaching Skullcrushers and Morbidex.
Once again, the Solar Engine goes off not with a bang but with a whimper...
Mass Skink shooting puts one wound on Morbidex.
The Scar-Vet kills the Khorne Champion, winning the combat but they hold, and the Oldblood slays the Exalted BSB (incorrect on the map, which shows him still alive).

The Screamers swoop low over the Skink-Kroxigor, killing one Skink, with Morbidex and the Skullcrushers joining up in a single intimidating line.
With a low magic roll, the Sorceror Lord's attempt on Glean is dispelled by the Slann.
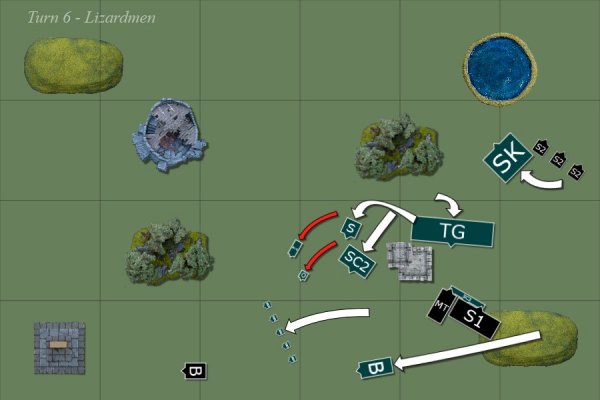
The Scar-Vet kills and breaks the Khorne Warriors, pursuing them into the flank of the Nurgle Warriors. Together, he and the Oldblood cuts down fully half their number.

The Temple Guard reform and turn to face the Skullcrushers, backing up further still after the Slann casts Walk Between Worlds. The Skink-Kroxigor back up also, and to complete the trap the Skinks exit the tower at an angle.
Finally remember the correct incantations, the Solar Engine temporarily lights up the battlefield with a second sun. When the dazzling light fades, all that is left of the Sorceror Lord is a smoking pile of ashes.
More Nurgle Warriors fall beneath the mighty blows of the Saurus heroes when they fail a Fear test.

Unconcerned, Morbidex and the Skullcrushers charge into the Skinks. The brave Champion accepts a challenge and is crushed underfoot; however, only two Skullcrushers make it into contact, and the Skinks narrowly avoid being wiped out. The Slann seizes control of their minds and forces them to hold despite certain death.

Without their ranks or their BSB, the Nurgle Warriors finally cannot hold and break, to be run down just like their Khorne brothers.
The Skink-Kroxigor reform and walk towards the north in order to secure the field, with the Temple Guard denying the Legion the bottom-right corner. The Slann leaves the unit in order to cast Walk Between Worlds on the Bastiladon, but it is cast with Irresistable Force. The resulting miscast sucks away all the remaining power dice, allowing the Plague Drone to escape.
Result: Lizardmen Victory!
I scored 16 out of a potential 20 TPs by winning my secret mission, denying my opponents’ (hence the last turn movement shenanigans), winning by more than 200VPs, and maintaining my fortitude.
Wow. What a game! So a few things first off: my opponent was incredibly unlucky with those Stupidity tests. I actually really like that Sorc Lord build as it makes something of his stat line, offering both a combat character and a lv 4 wizard, wrapped up on a mobile platform. S6 ASF is pretty great at leaping on any vulnerable opportunities. But failing twice in a row really took the pressure off and I won’t deny that it played a huge part in my victory.
I also made what I feel were four serious mistakes, and one potential one. First, the deployment of my Scar-Vet was out too far and meant he didn’t benefit from the BSB re-rolls for his Stupidity. That one’s just silly. The other one couldn't see around the tower to charge the Sorceror Lord. Secondly, not saving my Skink Priest. Thirdly, turn two I exposed the Skink Skirmishers to a charge from the Chariot and I’m lucky my opponent didn’t take it (I guess that he was worried about a Skink-Kroxigor counter charge?). And finally, I should have WBW some Skinks into range of the Plague Drone, or just 6-diced Spirit Leech at it, which I had swapped to earlier in the game. That one model was holding 4 TPS (killing it would have broken my opponent’s Fortitude) as well as 200+VPs.
The potential mistake was refusing to engage the Skullcrushers. Now, I’m not that concerned about 3 Skullcrushers: without any buffs I’ll take a bunch of casualties sure, but with sheer volume of attacks the Guard will grind them out in a round or two. The real concern is the Skullcrushers and Morbidex together. I can challenge him out for a round and smash up the Skulls, sure, but with that Regen there’s no way I’ll get him, and he’ll easily cut his way through the Temple Guard given time. That being said, he probably would take more than 2 rounds to do it, so it may have been a calculated risk to let them both in on turn 5. Still, I wanted practice playing the avoidance game, and that’s exactly what I did.
Nonetheless. Wow. Despite all that the list worked really well and I think I played a great game. Turns out castling up in a corner, running away from things you don’t want to fight, and using shooting and magic to soften stuff up is extremely effective. Who knew. In particular, then:
Oldblood & Scar-Vets. These guys are such bros. I was a little nervous about putting the Oldblood into the Nurgle Warriors as I wasn’t certain what gear the Exalted had, but I figured that the opportunity was worth the risk – at the very least, I figured that I would pin the unit in place for a while. I love his Carpet just for that sort of opportunity, even if I can get a better build if he’s on a Cold One. The second Scar-Vet is maybe a little too much redundancy?
Skinks. What’s not to love? They run around where you want them to, get in the way of stuff, and chip wounds off things.
Skink-Kroxigor. Okay, I'm willing to admit that I called this one wrong. I put these guys in for a one-day event in December just to mix it up a little bit, and have not regretted it since. They aren’t as powerful as the old book for sure, but their flexibility cannot be denied. Although they didn’t play a huge role in this game, they still increased my firebase for the first two turns, helping to kill off the chariot, set up a potential flank charge into the Khorne Warriors if they had taken the Skink bait, set up a potential trap for turn 6, then went and grabbed that table quarter. Their combination of mobility, speed and combat potential (if not realised) is fantastic – and all for, what, 200 points? Bargain. To hell with Saurus, I’m bringing these guys every time.
Bastiladon. Despite taking
4 turns to get it right, when they finally did, they did it big. To kill the Sorceror Lord I rolled 11 S5 hits. ZAP.
Slann. Through a combination of low magic rolls for the first three turns leaving me without many power dice or many dispel dice to store, and my opponent letting the Bastiladon through each time (correctly, at least for the first three attempts), the Slann really wasn’t delivering. But then in turn 4 he really took off with his channels, and increasingly so once the Sorc Lord was dead. High magic gave me a ton of options. In particular, and even though I definitely under-utilised it, WBW really makes you think outside the box!
So what’s next for the list? Well, I’m probably going to drop the Skink back down to level 1. I wanted him at 2 so that there’d be some redundancy with my Slann (ie either more magic missiles, or more combat buffs, just in case I couldn’t get Soul Quench or Hand of Glory off, respectively). But, on reflection, it’s not really worthwhile – the Slann should be sucking up all power dice in the early game in order to swap to spells that I want for the late game. Besides, Curse is pretty difficult for a level 2 to case, whereas Iceshard isn’t much harder for a level 1. So there’s thirty-five points. As to what I spend it on, well that’s another matter.
Anyway, it was a great game, a great victory, and as always a great opponent. As always, any and all comments and criticism are welcome. Next game will hopefully be on Friday at the local club, so expect to see something over the weekend.
Thanks for reading!
 . I didn't miscast all game in the last one though so it balances out!
