1. This site uses cookies. By continuing to use this site, you are agreeing to our use of cookies. Learn More.
  2. This is just a notice to inform you that we will move the forum to a new server sometime during the next few weeks. The actual process should not last more than a few hours; during this process, we will disable replying and creating new posts. As soon as we know the date for the transfer, we will update with more information.
    Dismiss Notice

7th Ed. The Defense of Konquata *New Game*

Discussion in 'Battle Reports' started by Xlcontiqu, Mar 29, 2010.

  1. Xlcontiqu
    Ripperdactil

    Xlcontiqu New Member

    Messages:
    454
    Likes Received:
    63
    Trophy Points:
    0
    Re: The Defense of Konquata *Tournament Update*

    So, I just concluded the tournament, and I have about two more games to post after this. It was an interesting finish, and we can say that a minor mistake decided it all! But onto the game at hand...

    Part 2: The Loss of Hypnotoad's Control

    As soon as Lord Xlcontiqu fled like a girl, the Lizardmen army began to feel more powerful, more quick, and above all more deadly. Both Saurus units let out a guttural roar and charged into the Squigs and the Savage Orcs with the Shaman. The Stegadon roared into the small unit of Savage Orcs and proceeded to squish three with in its crazy rage. Another group of skinks shot forward, sped by vestiges of the light, and took down a Pump Wagon. The fleeing skinks loved their master too much, and kept right on going. With almost everything locked in combat, some of the ranked skinks took a couple pot shots at the night goblins and moved on to combat. Well to make a longer story short, the Lizardmen annihilated the Orcs and Goblins. The Steg took a wound in return from its savage frenzy and ran down the Savage Orcs, the Saurus broke the orcs in the river, the other Saurus caused all the skinks to implode, and the large Skrox unit let the last survivor run away, as they turned for juicier targets. The Salamander put another wound on the Giant, which acted like a baby again. The Salamander did not fall to the old trick however, and passed his shaky LD4 check.
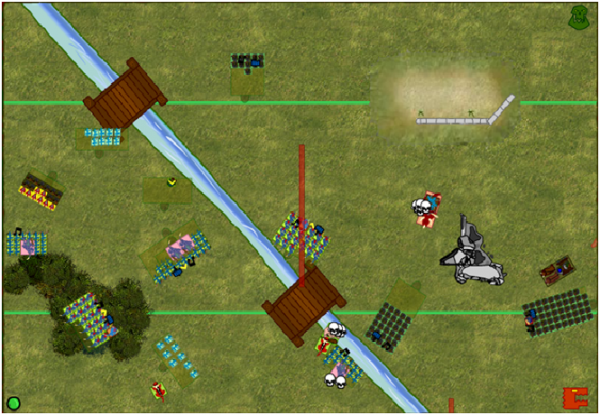
    LizardmenvsOrcsandGoblins1EndofLizardmenTurn3.png
    End of Lizardmen Turn 3

    Well, unfortunately the rest of the game was pretty much a non event. The Giant eventually broke the Salamander and got into the flanks of a tied up Skrox units, taking two wounds from the two ninja skinks attacking it. They were broken, and the Giant was killed by massed fire of a larger Skrox unit. The other Squig Herd lost all but one Squig when they ran down the other Skrox unit, then did some tricksy stuff and managed to keep the Squig alive by putting it in the middle of the unit, exploding when the Saurus broke it and killing the Scar-Vet, who had decided he was way to cool to be in the presence of the other weak Saurus any longer.
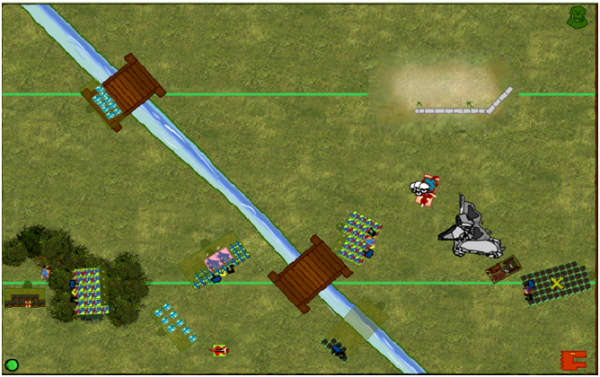
    LizardmenvsOrcsandGoblins1EndofLizardmenTurn4.png
    End of Lizardmen Turn 4

    The Night Goblins grew very afraid of the Salamanders and fled every time one looked at them, and the Stegadon eventually finished off the Boar Chariot with a lovely bolt thrower shot and a lone skink missile. At the end of the game, I had almost tabled my opponent, with a lonely unit of Night Goblins fleeing toward the edge of the board.
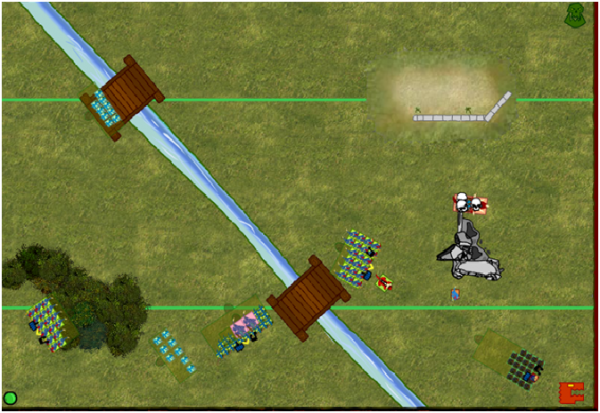
    LizardmenvsOrcsandGoblins1EndofGame.png
    End of Game

    The final score was 2,533 to 1309, with me winning by over one thousand VPs. It was a great game, and even though my opponent did not have the best of luck, he took it all in stride and remained a great opponent. I feel that I executed my plan quite well and even with the loss of the Slann, I still managed to pull out a large victory. Every game I play with this Slann build makes me like him even more, just because of the fact that his death is not that influential, and he can really add some strengths to the army.

    MVP: Would have to be the Salamanders. Holding up the Giant for so long, and taking out large chunks of the opponent's army was fantastic. Honorable mention would have to go to the river.

    LVP: The right Chameleon skinks. The more I use these guys, the more I feel that it would be better with only one unit. Maybe I am just not using them correctly.

    As always, comments and criticisms are more that appreciated!

    Lord Xlcontiqu reappeared from behind some bushed. Well, it appears they did not need my help, he thought. Good think I kept out of harm's way then. He felt some foreboding again. Maybe his troubles were not completely over, as a saw lances of knights cresting the far side of the battlefield. Maybe they were just beginning.
     
  2. The Hunted
    Carnasaur

    The Hunted Active Member

    Messages:
    1,011
    Likes Received:
    137
    Trophy Points:
    38
    Re: The Defense of Konquata *Tournament Update*

    Horray for lord...wait, no. Go army :)

    Perfect example of how NOT to go all-in on a general. You kept your head cool and took victory.

    Well done!

    The Hunted
     
  3. Xlcontiqu
    Ripperdactil

    Xlcontiqu New Member

    Messages:
    454
    Likes Received:
    63
    Trophy Points:
    0
    Re: The Defense of Konquata *Tournament Update*

    My next battle report will be going up tonight. To keep you all entertained unit then, check out this dancing bear and my proposed army list for my next tournament!

    Cheers!
     
  4. steam
    Skink

    steam Member

    Messages:
    47
    Likes Received:
    3
    Trophy Points:
    8
    Re: The Defense of Konquata *Tournament Update*

    really great battle reports.
    How do you do such maps?
     
  5. Elmquasmash
    Razordon

    Elmquasmash New Member

    Messages:
    382
    Likes Received:
    3
    Trophy Points:
    0
    Re: The Defense of Konquata *Tournament Update*

    :( Still waiting... 'Tonight' was over a month ago :p
     
  6. Xlcontiqu
    Ripperdactil

    Xlcontiqu New Member

    Messages:
    454
    Likes Received:
    63
    Trophy Points:
    0
    Re: The Defense of Konquata *Tournament Update*

    To begin, let me apologize for how long it has taken me to update my thread. The bad news is that because my computer crashed, I lost all the pictures and notes, so these battle reports are going to be a little sparser than usual.

    Actually, ignore that last statement about pictures. I managed to find the pictures due to the battle report thread on the tournament forum and thus, there will be pictures! However, my notes are still lost, so the battle report may not be 100% accurate.

    Lord Xlcontiqu looked out onto the field, the opponent's bright heraldry hurting his eyes. The human cavalry had come and in large numbers, so the Lizardmen army was braced to receive the brunt of many charges. Lord Xlcontiqu ordered his troops into defensive positions and prepared for the fight.

    Bretonnian Army List

    Brettonian Lord, Shield, Knightly Vow

    Prophetess, Pegasus

    Paladin, BSB

    Paladin, Questing Vow, Morningstar

    Paladin, Grail Vow, Lance

    7 Knights of the Realm, Standard, Champ

    6 Knight Errant, Standard, Champ

    2x20 Peasant Bowmen, Braziers, Standard, Musician

    30 Men at Arms Standard, Musician

    3 Pegasus Knights, Standard, Champ

    9 Questing Knights, Standard, Champ, Banner

    Trebuchet

    Trebuchet


    Deployment

    My plan was to eliminate the archers and trebutchets with skink and Terradon fire and to get stuck my Saurus blocks stuck into combat against the knight units, knowing that over time, I would be able to win out. His Pegasus Knights were what I was afraid of the most, with their long charging abilities and maneuverability. I did not really have much of a plan to kill them, except to try and delay them for as long as I could. For spells, I believe his Prophetess got Throne of Vines, Dwellers Below, Regrowth, and some other spell that was never really used. My Slann got Speed of Light and another three spells that I cannot remember and/or were never used.

    The Bretonnians decided not to pray and got first turn (a luxury I never seem to be able to acquire). His units rumbled forward with the rightmost knight unit charging the Chameleon Skinks and managing to get two wounds from stand and shoot and combat! In the magic phase, Throne of Vines was successfully cast as was Dwellers Below, meaning I lost a Kroxigor and some Skinks from a smaller Skrox unit. Lord Xlcontiqu obviously let them have them, so that the Bretonnians could at least feel like they managed to kill something. In shooting, two Terradons got killed, but one of the trebutchets was filled with firecrackers and exploded (sillly humans). The charging knight block reformed after killing the Chameleons and the Lizardmen prepared to counterattack.


    End of Bretonnia Turn 1

    Lord Xlcontiqu sounded the order and the Lizardmen rushed forward, the Terradons flying over the archers and dropping rocks. No charges were declared and the mighty Slann tested the Winds of Magic, his dancing prowess succeeding again and speeding up the Lizardmen's steps. Shooting was pitiful, with the exception of the Salamanders who panicked one knight unit and killed off a Questing Knight. Nothing else panicked, so the Lizardmen took a short break.


    The rest will be up tomorrow, sorry for the lack of details, but it is quite a time back in my mind.

    The upcoming turns highlight a Stegadon that just won't die, some headstrong knights, and has Lord Xlcontiqu met his match?
     

    Attached Files:

  7. The Hunted
    Carnasaur

    The Hunted Active Member

    Messages:
    1,011
    Likes Received:
    137
    Trophy Points:
    38
    Re: The Defense of Konquata *Tournament Update*

    Awesome. Simply awesome.
    Always worth the wait :), although this time: you were really pushing it!

    My terradons always seem to turn tail after being shot at...yours are truly powerfull!

    Your positionning is nothing to be worried about. Looks good. The ranged stuff should be no problem for your terradons and skinks, and well: if your slann found his match; he can sure light a fire! ;)

    The Hunted
     
  8. Xlcontiqu
    Ripperdactil

    Xlcontiqu New Member

    Messages:
    454
    Likes Received:
    63
    Trophy Points:
    0
    Re: The Defense of Konquata *Tournament Update*

    Part 2: Do the Saurus Shuffle!

    The Brettonnians looked down their lances and charged. The archers went into the Chameleons, the Questing Knights into the Skink Skirmishers, the Pegasus Paladin (PP) into the Stegadon, and the Pegasus Knights into some Skinks. In other news, the small knight unit failed to rally and fled off the table. Magic was uneventful and shooting equally so. In combat, the knights showed their knights showed their prowess with the Peg Knights running down the skinks and the Questing Knights running down the skinks who fled. The PP fluffed and failed to Killing Blow the Stegadon, but the Stegadon managed to not dent the PP either. The archers fluffed too and did not manage to break the chameleons.


    End of Bretonnian Turn 2

    The Lizardmen counterattacked by doing the Saurus shuffle! This ancient move was discovered by Lord Xlcontiqu when he first started practicing Light magic. It was a dance only used when the ranks of Lizardmen were in trouble. (I really had no idea how to deal with the knights. I kind of just started moving Saurus into threatening postures and hoping my opponent would get scared.) The Terradons charged the Trebuchet and that was that. Magic was bad, with not much of significance happening. (It is possible a Speed of Light got off, but I am not sure. I does not really matter). In shooting, the Salamanders managed to waste a unit of archers and panicked them off the board, and panicked the Men at Arms, starting their long run towards the end of the board. Combat was hit and miss, with the Stegadon growing an extra set of legs and catching the PP, but the Terradons only wounding the Trebutchet and the Chameleons failing to kill and Archer (but holding nonetheless).


    End of Lizardmen Turn 2

    And then, crap hit the fan. The knights charged the Terradons, Peg Knights charging more skinks, and Questing Knights charging the Saurus on the hill. At this point, most of the Bretonnian army was engaged, so very little other moves occurred. One successful Dweller's later, and Lord Xlcontiqu began hiding in a hole for the rest of the game. The Knights killed off the Terradons, the archers broke and ran down the Chameleons, and the Peg Knights ran down the Skinks. The only glimmer of light in this dark turn was the Saurus managing to beat the Questing Knights. And so, with their leader gone and many Skinks dead, the Lizardmen army began to look a little worse for wear.


    End of Bretonnian Turn 3

    Drastic measures needed to be taken, with the Bretonnians having superior magic and charge capabilities. I would need to bring the fight to them. But first, Lord Xlcontiqu must be honoured. The unengaged Saurus did another Saurus shuffle in memory of Lord Xlcontiqu, with the Stegadon, Salamanders, and Skinks adding their backup dancing skills to the mix. (Salamanders can't dance. But don't tell them I told you.) The only unit that did not dance was the small Skrox unit, but they had something in their sights: the Trebutchet. Magic was terrib... nonexistant, but the Skrox unit javelined off the last wound of the Trebutchet. In combat, the Saurus managed to kill another few knights, and receiving few casualties in return, held on again.


    End of Lizardmen Turn 3

    More charging from the Bretonnian side, with the Peg Knights getting fancy with a dancing Salamander and the top knights deciding to check out the Skrox unit. The Men at Arms still did not rally and the archers decided to dance around in the wood. Another successful Dwellers dropped the back rank of the large Skrox and same some Questing Knights come back to life. Not enough were brought back and the Saurus again proved their worth, reducing the Knights down to three models. The top knights also fared badly, losing four knights and failing to break the Skrox unit. (Can anyone say Steadfast Leadership 7? Well, my dice did.) The only good thing in the Bretonnian combat phase was a dead Salamander, courtesy of those Pegasus Knights.


    End of Bretonnian Turn 4

    At this point, Lizardmen were once again in a dominant position and the battle was winding down. The unengaged unit of Saurus took a Dwellers to the face, as did the large Skrox unit, but not unit they had finished beating down the Lord and his knights. The lower Saurus munched through the rest of the Questing Knights and the small Skrox unit got crossfired by the archers and rallied Men at Arms after breaking from the Knights. The Stegadon took a Peg Knight charge, broke and got away, rallied, took another charge, and then finished them off with the Saurus help (after they had finished their Saurus shuffle). The Scar-Veterans managed to charge the Prophetess, and she ended the game fleeing.


    End of Game

    The final score was 2230 VPs for Lizardmen and 1331 for the Bretonnians.

    After this game, the benefit of a bare bones Slann was really shown. I lost him third turn and still managed to win the game. Additionally, despite what many say, Dwellers is not that bad against Lizardmen. My opponent managed to get it off five times and still lost by 900 VPs. It killed my Slann, a rank of Saurus, more than twenty Skinks, and a couple Kroxigor. My greatest mistake in the match was my inability to do anything with my rightmost Saurus and the only thing that saved the right flank was my Steroid Stegadon.

    MVP: Mr. Steroid Stegadon (or the Roid Steg for short.) He singlehandly took a charge from the PP with Killing Blow, managed to break him, and took two charges from Pegasus Knights and managed to survive.

    LVP: Rightmost Saurus. They did nothing except dance all game. They were a little misplaced, but contributed very little either way.


    Unfortunately, I do not have pictures for my last match, but I will give a quick rundown. It was against a Daemons of Chaos army with Bloodthirster, two units of Flesh Hounds, a couple wizards, two units of thirty Bloodletters, and some fluff.

    Basically it boiled down to the last turn. He charged my Slann, my Slann copped two wounds and held, then my Saurus charged the rear of the Bloodthirster (due to a reform after they killed off the flamers) and I challenged with my Scar-Vet, hoping to knock off the last wounds from the Bloodthrister. He fluffed, but I still won combat and the Bloodthirster popped on boxcars.

    I lost by 55 points. If I had not sacrificed my Scar-Vet (the smart decision) I would have won. /facepalm

    Hope you enjoyed, despite the wait, and comments and criticisms are greatly appreciated.
     

    Attached Files:

  9. Xlcontiqu
    Ripperdactil

    Xlcontiqu New Member

    Messages:
    454
    Likes Received:
    63
    Trophy Points:
    0
    Re: The Defense of Konquata *Tournament Update*

    Epilogue: An Ode to the Lone Slann

    Time to do a little list evaluation and give some afterthoughts.

    List Changes: Very few. The list I used is very solid, despite seemingly lacking some magical power the Slann usually brings. However, after this tournament, I am a firm believer of the bare bones Slann. Not only does a cheap Slann give you points for other things, it also allows you to come back from losing him. If you lost a 600+ point Slann, it really impacts your magic phase and your VPs. Especially if the Slann is general and BSB. However, with a really cheap Slann, you can lose him and still go on to win, as shown by my battle reports. Additionally, I found the games were I lost the Slann to be less close as the games where he stayed alive. In the first game against High Elves, I was losing until a very bad Purple Sun changed the game. In the second game, the Slann took a charge from Squigs and the unit that charged ended up getting flank charged, something that really did not need to happen. In fact, charging the Saurus in the front was possibly a better idea than charging the Slann. In the third game, the Slann dictated where the opponents mage needed to be and ultimately drew here away from other critical combats and put her into danger. In the last game, the open Slann caused a Bloodthirster to charge and nearly cost my opponent the game.

    So this possibly demonstrates another possible tactic: Slann-baiting. An open Slann seems to put pressure on opponents and psychs them out even before he begins casting. Stupid moves seem to come a little more frequently and the desire to kill the Slann sometimes overrides smart moves. Sure, when the Slann is lost, you lose a lot of points, but the opponent could be put in a very unfavourable position because of it, as demonstrated by the squigs and Bloodthirster. The Slann is a dual threat, good at magic and psychologically dangerous.

    Looking at the rest of the list, there are very few things I would change. The list is build very well (cue inflating ego). Now I am not trying to toot my own horn, but this somewhat unconventional list seems to fair well against a large number of opponents. One thing I am thinking about doing is swapping blowpipes for the javelin and shield on my skirmishing skinks. The more I play with blowpipes, the better I think the list would be without them. The Chameleons can fulfill that role quite well and I think the javelins might work better overall. The Saurus blocks are solid, as are the Scar-Veterans. I love my Terradon units and the regular Stegadon is ace. That giant bow has done so much for me, taking out chariots, wounding Bloodthirsters, and knocking down heavily armoured targets. Additionally, the blowpipes of the Ancient Stegadon are good, but I do not think this army needs any more back up in the shooting phase. And as always, the Salamander are fantastic.

    I am going to look at the lore choice a little before I close. The Lore of Light is not the most often used lore, with Life trumping it in most list, but I think it adds something to the Lizardmen list the Life lacks: initiative boosts. That is where Lizardmen suffer the most, and this lore eliminates them. I find that all I need is a good powered up Speed of Light and my magic phase will be a success. The bubble spells are awesome and allows most of the Lizardmen force to be very nasty in combat and protect against nasty initiative based spells.

    Well, in closing, this tournament was a lot of fun, and all my opponents were great. I would not have changed anything*. I leave you with a parting picture of my army.

    *Except for sacrificing my Scar-Veteran to the Bloodthirster, costing me the game and the tournament.

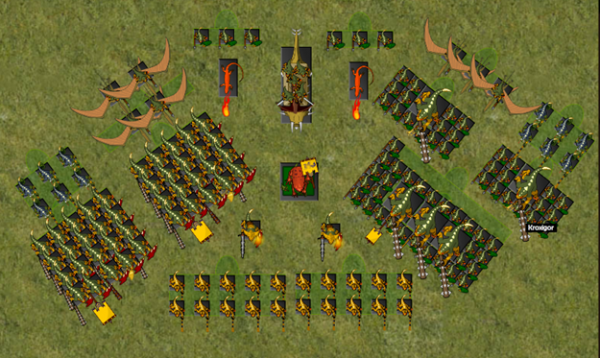
    LizardmenArmyPicture.png
    Bet you thought is was a real picture, didn't you? But the battle server got a great upgrade and everything looks way more awesome.

    Lord Xlcontiqu prepared to rest, all this fighting wearing him down. He sounded out the order to return to Konquata. It was time for a nice long nap.
     
  10. The Hunted
    Carnasaur

    The Hunted Active Member

    Messages:
    1,011
    Likes Received:
    137
    Trophy Points:
    38
    Re: The Defense of Konquata *Tournament Update*

    What can I say, nice battle with the brets. It also shows how important deployment is.

    Too bad you didn't win the tournament though...I hate being 2nd*

    The slann-baiting is a valid tactic, though risky. 'The mad king' or something is the chess variant of that.
    And yes, putting your slann out in the open wíll make your opponent think twice. Which surely has impact on his gameplan/charges.

    A silent hint you won't post any battles anymore (for a while)?

    The Hunted

    *'Coming out 2nd means your the first loser'. One of my mottos. I truly despise being 2nd!
    On the World Championship Football 2010 in south-africa...we came in: second. 'Nuff said.
     
  11. Xlcontiqu
    Ripperdactil

    Xlcontiqu New Member

    Messages:
    454
    Likes Received:
    63
    Trophy Points:
    0
    Re: The Defense of Konquata *Tournament Update*

    No Rest For the Weary: The Saurus Shuffle Gets Upgraded

    Lord Xlcontiqu sighed, it appeared that he would indeed not get any rest, even after fighting so many battles. He hovered to the front of the army to see what was happening. He saw the white and blue clothing and visibly sagged. Not those pansy elves again. Well, this time he would show them a lesson they would not soon forget.

    So, even though I thought I might take a break, I have a ton of free time and decided it would be wise to start up a little practice game, to test the army some more. My opponent was using the following:

    1 Archmage with some stuff and Lore of Heavens
    2 x 1 Mages with some stuff and Lore of Shadows
    1 Prince BSB with some stuff
    2 x 16 Spear targets
    2 x 13 Archers with a deep love for mages
    3 x 1 Tiranoc Chariots that are afraid of small animals and loud noises
    1 x 5 Dragon Princes full of self-sacrifice (literally!)
    20 ish Phoenix Guard with a tattered flag giving three more Power dice a turn
    4 x 1 Eagles who are just plain annoying

    Now the Banner of Sorcery does not actually give three Power dice, but when you play against me it sure does. Every. Single. Turn. We were playing closed list and deployed something like this:

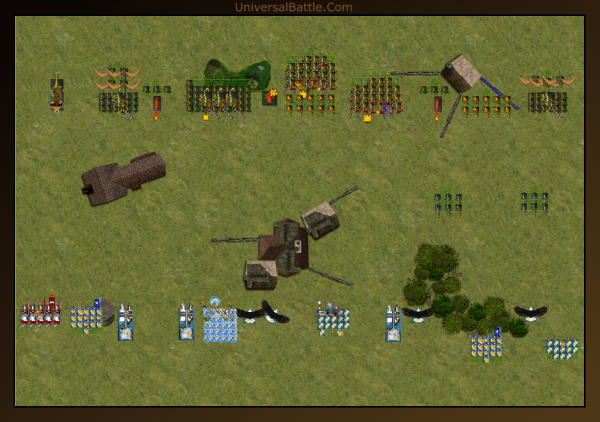
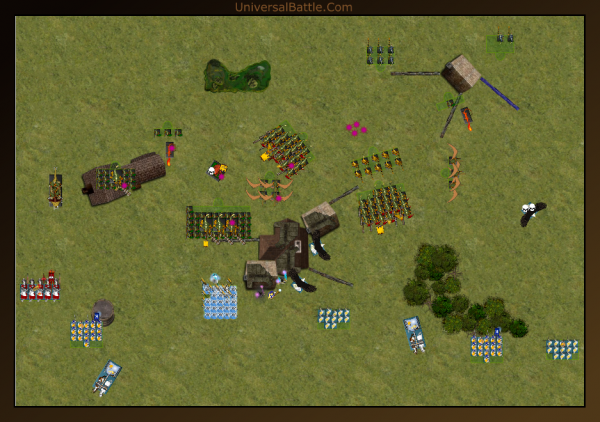
    LizardmenvsHighElvesEndofDeployment.png
    Deployment

    There was a lot of magical terrain, but it did absolutely nothing the whole battle so I will ignore it. My deployment went well, but there was a critical flaw, which will show its in the later parts of the battle. I got Pha's, Speed of Light, Banishment, and Timewarp for my spells and won the roll for first turn. I elected to go first and started the game.

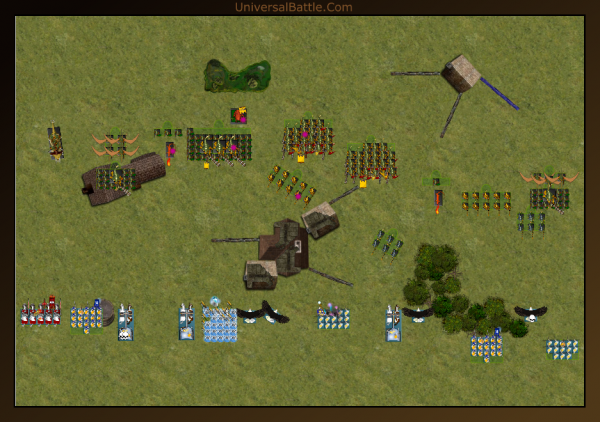
    I moved everything up. Immediately I started to get a little cramped around the central building (which was impassable). My Saurus were trying to go everywhere and it just was not working. Magic saw me get off a Speed of Light bubble which would protect me against some of the Shadow Mages he had. Shooting saw two wounds being taken off a Tiranoc Chariot and another one off the eagles. With that, I ended my turn.

    LizardmenvsHighElvesEndofLizardmenTurn1.png
    End of Lizardmen Turn 1

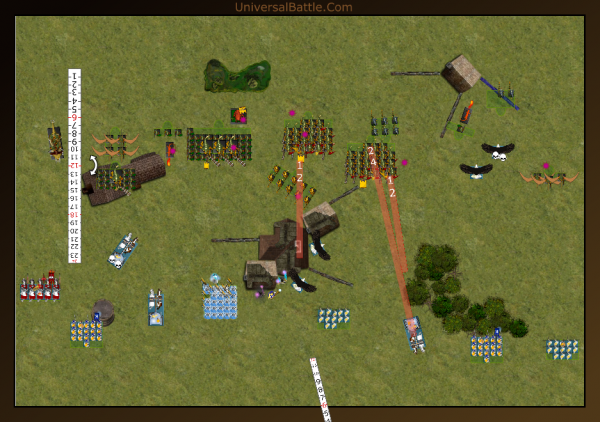
    He started his turn by shuffling his units around a little too. His mages all took cover behind the large impassable building. A pair of eagles charged into my skirmishers, with one taking a wound on the way in. Magic saw the movement of both Saurus dropping and an Iceshard Blizzard being cast on the Terradons (which did not wound). His shooting panicked a Salamander and some Chameleon skinks. In combat the skirmishers were broken, which panicked the Skrox off the board. Things were not looking good for the right flank.

    LizardmenvsHighElvesEndofHighElvesTurn1.png
    End of High Elf Turn 1

    Part 2 brings more of the Saurus shuffle, a sacrificial Dragon Prince, and some sneaky dealings with the mages.
     
  12. The Hunted
    Carnasaur

    The Hunted Active Member

    Messages:
    1,011
    Likes Received:
    137
    Trophy Points:
    38
    The modern magical gunline! Tough going...even vs T3 High Elves.

    Looks pretty grim to me!

    The Hunted
     
  13. Xlcontiqu
    Ripperdactil

    Xlcontiqu New Member

    Messages:
    454
    Likes Received:
    63
    Trophy Points:
    0
    I have finally gotten around to posting fluff about my army. It can be found here and will probably be added too as time passes.

    I should have the second part of the battle up tonight. And with that, comes a little surprise.
     
  14. Xlcontiqu
    Ripperdactil

    Xlcontiqu New Member

    Messages:
    454
    Likes Received:
    63
    Trophy Points:
    0
    Part 2: The Stumbling Stegadon

    The Lizardmen line moved forwards, the Stegadon stumbling and failing to contact the Dragon Princes. Missed by an inch. The Salamander rallied, but the Chameleon Skinks were still to afraid to turn and face the wounded Eagles. The Terradons swooped and dropped their payload, killing and Eagle and panicking the wounded one. The large Skrox unit castled up behind a wall. The larger Terradons flew back by the Slann to keep from fleeing. Lord Xlcontiqu tested the winds and threw out a bubble of protection. After that, he threw out a radiating Speed of Light to heat up the surrounding Lizardmen (rolled a 6,6,6). The wound that he received in return was worth it. Shooting took down a wounded chariot and panicked the other. And with a successful magic and shooting phase behind them, the Lizardmen watched as the High Elves began to move

    LizardmenvsHighElvesEndofLizardmenTurn2.png
    End of Lizardmen Turn 2

    The High Elves pushed forward, the Dragon Princes rushing into the Stegadon. The rest of the High Elves shuffled around, with the mages ducking into an archer unit to keep from being dropped upon. Everything in the High Elf army rallied. Magic was successful with a Comet lovingly coming down within the Lizardmen ranks. A hex got through, weakening the weaponskill of the Stegadon. Then when combat rolled around, the Dragon Princes took down a number of crewmen, and the weaponskill of the skink was just not enough to get past the elves' defenses. The Stegadon broke and was caught, panicking the Skrox unit in the building, how proceeded to flee all the way past the mages, panicking the Terradons and the Skink Skirmishers.

    (No picture this turn. Forgot to take a screenshot.)

    Part 3 will feature the conclusion of the match, with a deadly comet, Saurus armed with pom-poms, and the return of the Chameleon's bravery.
     
  15. SeBM
    Terradon

    SeBM New Member

    Messages:
    597
    Likes Received:
    17
    Trophy Points:
    0
    Seriously, you kept the suspense for a while, bring us the end of the battle!!!
     
  16. The Hunted
    Carnasaur

    The Hunted Active Member

    Messages:
    1,011
    Likes Received:
    137
    Trophy Points:
    38
    Xlcontiqu have you forgotten about this thread?

    The Hunted
     
  17. Xlcontiqu
    Ripperdactil

    Xlcontiqu New Member

    Messages:
    454
    Likes Received:
    63
    Trophy Points:
    0
    Sorry guys, this semester in university has been pretty darn tough on me. I'll try to update it during our Christmas break when I get the time.
     

Share This Page