• The forum software have been upgraded to the latest version.

    If you notice anything that looks off, or does not work, please let us know.

    For more information, click here.

Blog Caprasauridae's Lizardmen (Woogity's Rex! )

The photo/lightbox is not all that necessary
Not necessary... but very nice to have. Having light shine evenly from multiple sides is a big bonus. I think a lot of the best miniature pictures are taken using a light box.
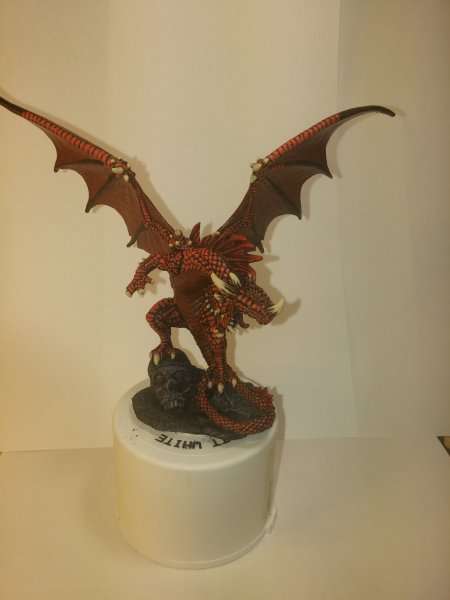
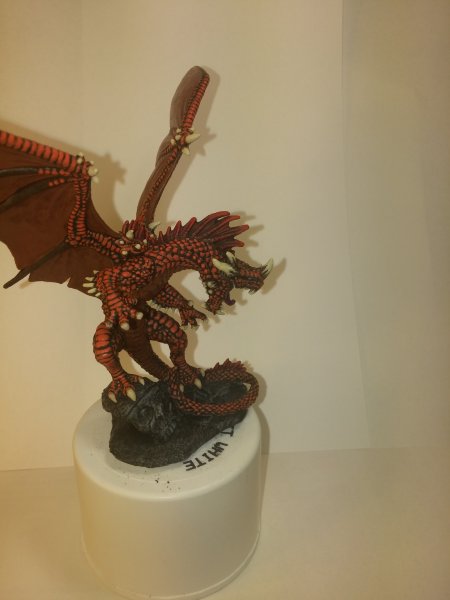
Agreed, it is a nice to have. But my point is that the twinned lights and a background that is not stark white are the two things that will make the largest immediate improvement for Caprasauridae's next batch of pictures.

@Caprasauridae - the white background is probably throwing off the camera's light-meter and the visible dark shadows will go away if there is a second light bulb streaming light in from a different angle.
 
Actually, there's already three light sources: one table light, one floor standing spot light and the kitchen light hanging from the ceiling (it gets rather close to the table). I can definitely try to use a more greyish background and see how that turns out. Lightbox would be nice, I guess I could check some tutorials on how to make one. Thanks for all the tips guys!

EDIT: Here' a quick picture of my usual set up. Please note that this is taken in the morning, when the sun is shining from the kitchen windows. I usually take the pictures later in the evening, when the sun light is less direct.

20150429_092444.jpg
 
Last edited:
@Caprasauridae , you may find this article of interest it highlights the @pendrake point about the camera not seeing white and using grey to trick the camera.

I've invested in a light box setup but still trying to get the camera setup right!

http://taleofpainters.blogspot.co.uk/2015/01/tutorial-beginners-guide-to-miniature.html

And this one for all you smart phone users ;)

http://taleofpainters.blogspot.co.uk/2015/02/tutorial-how-to-photograph-miniatures.html

Here is a pic taken with the camera+ app with no lighting.

image.jpg
 
Last edited:
Thanks for the links! I quickly read them, but will definitely read the smart phone one more carefully. I have an app that I would like to try, and if that doesn't work, I have access to Photoshop (no skills with it, though. But Google School of Learning Everything should help with the basics) and other software.
 
here's my typical setup,
125763-100_7610-1.jpg

(notice all my fancy paint and expensive brushes)
 
Last edited:
Ok, time to post some progress pics! I have finished laser apparatus for the Bastiladon, and the Bastie himself (he has been finished for a long time, though), so I thought I could post some pictures. It still needs the Skinks and some minor touch ups, like the rim of the base. Also, I might or might not try to add a glow effect on the crystal. Let's see, I want to practice it a bit more first.

I call him Stinky. That's because I used several really heavy washes on his body and he stunk... The armour was practice on line highlighting. The lines are quite thick, but it was a good exercise. And the crystal...? Sigh, I repainted it, from the beginning, three times. Originally I wanted it to be purple, but it was too difficult to make it look glowy without making it pink... So, instead I painted it blue. I used the two brush blending technique for the first time, and I must say I'm really happy with the results! Now, it is still very difficult for me, and I can't do smaller areas (only the big sides of the crystal are painted with that, the top part, lower part and the smaller crystal are just simple layering, not even that good...), but it was encouraging, and I will keep practicing it.

Anyway, here are the pictures. Hope you enjoy and if you got any questions or comments, feel free to post them!

Basti sivulta 1.jpg
Basti eesta 1.jpg

Basti ylhaalta 1.jpg

Bastin kristalli 1.jpg

Bastin hanta 1.jpg
 
Nicely done, :D
and very nice shading on the gem.
oh don't forget to paint the sides of your base. ;)
 
Last edited:
Thanks, n810! Yeah, I always do the sides last, but maybe I should do it before the Skink butt in to make it more difficult...
 
I used the two brush blending technique for the first time, and I must say I'm really happy with the results! Now, it is still very difficult for me, and I can't do smaller areas (only the big sides of the crystal are painted with that, the top part, lower part and the smaller crystal are just simple layering, not even that good...)
Don't sell yourself short... I think it turned out extremely well. Great job!
Woohoo, my first Spider-Man! Thanks!
And your second... :spiderman:
 
Thanks for the Spidey! I'm really happy with the crystal, but I just wanted to voice my current limitations out loud. Then, hopefully, some day I notice that I can blend areas like that with ease!
 
I'm really happy with the crystal, but I just wanted to voice my current limitations out loud.
It's probably one of the best Bastiladon crystals I've seen. No doubt you'll get better with time/practice, but your work is already very good!
 
Aww, thanks @NIGHTBRINGER , but I must say, then, that you haven't been watching enough pretty Bastiladon pictures...

Oh, and how fitting, my rank is now Bastiladon as well!
 
A side project I'm currently working on: a gift for a friend. He wanted a dragon, so I spent about a week to find a miniature I like. It was tough. But then, Reaper Miniatures comes to help! The Pathfinder Red Dragon, I love this model! Here's where I'm at now:

20150712_230020.jpg

20150712_230032.jpg 20150712_230048.jpg


It's Reaper plastic, which comes with it's own downsides. It's super bendy. The mold lines are impossible to remove. Some details are smudgy. I should have bought the metal version, but they were hard to find and very expensive...

Any ideas of improvement? I was thinking of adding some different coloured scales, and maybe tint the orange to a more reddish shade.
 

Attachments

  • 20150712_230020.jpg
    20150712_230020.jpg
    870.3 KB · Views: 1
  • 20150712_230032.jpg
    20150712_230032.jpg
    927.6 KB · Views: 1
Awesome job! The style reminds me of comic book art. How big is the dragon compared to Warhammer minis? I wanna get some dragons for Storm of Magic games with my brother.
 
Thanks, Krox! I can post a size comparison picture tomorrow, it's too late for that now. I think it's comparable in size to the old Carnosaur, though the Dragon is not as long and is slender, and could chomp a Skink from Stegadon's back. The Dragon is currently glued on an Army Painter spray paint bottle cap, that can give you some kind of idea of it's size.

EDIT: Here's a very quick comparison with a Steggie

20150713_101539.jpg
 
Last edited:
@Caprasauridae

Very nice, I would not change the scale colour instead I would change the colour of the underside of the wings, dark near the body fading lighter to the edge and the edge highlight the spines and maybe do some freehand viens.

Go on you know you want to.
 
Ah, yeah, the wings have been only basecoated, same goes to the scales on the stomach. Thanks for the ideas, I was thinking of doing something like that. Maybe mix Ushabti Bone with Fire Dragon to get a creamy colour with a bit of orange tint. And then highlight with Ushabti Bone. I need to see how that looks like on a test piece of sprue, first.
 
Back
Top